Introduction[]
Hildebrant's Cellar is a never-ending dungeon which challenges the adventurer to delve as deep as they can before succumbing to death. Ever wonder if it was possible to go on indefinitely? Well, in this guide, we detail how to cheat death and dive infinitely into the depths of the Inferno.
How to achieve an infinite hildebrant's cellar?[]
The strategy to going on forever is to make sure you can't be touched by enemies room after room after room. If you cannot be hit, you won't spend godsbeard to heal your party and thus can go on forever into the depths of the cellar.
How is this accomplished? Well, we make use of one or both of the notable strategies detailed in the ![]() FTK Master Guide. That is, we either Reset the enemy team over and over, or we Party Rush our adventurers over and over so that the enemy never gets a chance to attack.
FTK Master Guide. That is, we either Reset the enemy team over and over, or we Party Rush our adventurers over and over so that the enemy never gets a chance to attack.
I personally achieved this with a team consisting of a ![]() Scholar, a
Scholar, a ![]() Monk (using
Monk (using ![]() Strength weapons initially and switching to
Strength weapons initially and switching to ![]() Intelligence later on), and a
Intelligence later on), and a ![]() Minstrel.
Minstrel.
There is one other strategy that works nicely for solo runs. That being raising your evasion to 100%. This can be accomplished with a solo Hunter, given a Shadow Sanctum for speed, maxing natural evasion to 25. Then purposely applying Jungle Rot to increase evasion by +5 for each amount of Jungle Rot you can accumulate. Finally, equipping evasion gear to reach 100% evasion.
All about the weapons![]
To make this work, it's all about the weapons! We need the uber weapons that provide enemy team Reset or Party Rush. These are the needed weapons:
| Volcanic Tome | |
| Royal Lute |
| Tome of Wonder | |
| Golden Lute | |
| Goblin Staff |
With these weapons, you can prevent the enemy from attacking you. However, there are a couple of problems. One, we need to survive long enough to get these weapons. That in and of itself can be a challenge. Two, we will need ![]() Focus to use these weapons, which means we'll run out of focus very fast. If you're out of focus, then the weapons fail and you die eventually.
Focus to use these weapons, which means we'll run out of focus very fast. If you're out of focus, then the weapons fail and you die eventually.
Obstacles to survival[]
Surviving long enough to have these weapons either drop to you or having them available for purchase at a goblin merchant's shop is the biggest obstacle. As we cannot control when that happens, we'll have to just hope to survive long enough for that to happen. We can try lesser variants though to help us get that far! Those lesser variants we'll discuss down below.
For the second problem: running out of focus. We need a solution to the issue of restoring focus without having to rely on consumables. In order to handle this problem we once again need some very important weapons to drop for us. There are two in particular we need:
| Starfish Staff | |
| Great Water Tome |
The Starfish Staff is more likely to be made available to the team first, while the Great Water Tome won't be available until you dive very deep into the cellar — so once again you'll be at the mercy of the RNG to get these weapons. But...if you can survive long enough to get them, you can set up for an infinite cellar dive.
The desired infinite cellar setup[]
What we want to achieve is a team decked out in one of the following ways:
| Tome of Wonder | |
| Great Water Tome | |
| Golden Lute |
| Tome of Wonder or Goblin Staff | |
| Tome of Wonder or Goblin Staff | |
| Great Water Tome |
The way this works, is we start with the Scholar rushing the Monk and Minstrel with the Tome of Wonder or Goblin Staff. The Minstrel will then rush the team again with the Golden Lute, placing the Monk and Scholar at the front of the timeline. From there, that pattern can be repeated as much as desired.
Stopping time[]
The important part of this process is the Monk using the Great Water Tome and getting two free actions. With one of those actions we attack an enemy, putting ![]() 2 into that attack to make sure it hits and does decent damage. With the second action the Monk puts
2 into that attack to make sure it hits and does decent damage. With the second action the Monk puts ![]() 2 into a Party Focus Restore and restores
2 into a Party Focus Restore and restores ![]() 4 for each character (including the Monk themself). This process allows both the Scholar and the Minstrel to put up to
4 for each character (including the Monk themself). This process allows both the Scholar and the Minstrel to put up to ![]() 4 into their respective Party Rush actions because that focus will be restored by the Great Water Tome.
4 into their respective Party Rush actions because that focus will be restored by the Great Water Tome.
Thus, we always get one free attack from the Great Water Tome and restore all characters back to full focus, allowing the entire process to be repeated. It's a bit slow because you're only getting one attack in per three character actions, but that one action is always free. So you can slowly destroy the enemy team one Great Water Tome attack at a time. The enemy will never get their chance to attack because the rushing of the party is essentially stopping time.
Less than optimal setups[]
So the strategy above is the desired setup. However, until we can get that combination of weapons, we'll settle for lesser variants:
Variant setup #1[]
Suggested weapon variants[]
- Goblin Staff
- Some other weapon with a single target Rush ability.
Strategy[]
With this combination, the Goblin Staff will be used to Party Rush. Then some other weapon with a single target Rush ability like an Ornate Lute or a Knotted Staff will be used to rush the character with the Goblin Staff. Repeat that for as long you have focus.
There are two problems you'll need to overcome. One, you'll need to restore focus somehow or else this engine will stop functioning. Two, you'll need a character with a very high Intelligence and/or Talent stat to make sure they don't fail the stat checks. The Goblin Staff's group rush ability requires four roll checks. If you spend more than ![]() 2 to ensure the staff works, you'll run out of focus and the engine will stop working. So to make this effective, you must be able to get the Goblin Staff to succeed with the Party Rush roll checks with just
2 to ensure the staff works, you'll run out of focus and the engine will stop working. So to make this effective, you must be able to get the Goblin Staff to succeed with the Party Rush roll checks with just ![]() 1 spent or none at all. That means having
1 spent or none at all. That means having ![]() 90+ on the character using it (ideally maxed out at
90+ on the character using it (ideally maxed out at ![]() 95).
95).
The first 10 rooms[]
You won't succeed in getting the Party Rush to go off every time, but you'll probably get it to work 80 to 90 percent of the time. The times it fails you'll have to tank that damage or hope you dodge. Ideally the limited number of godsbeard you get at each goblin merchant's shop every 10 rooms will be enough to heal you through the failed times when you take damage. You can help yourself by equipping regeneration items like an Amber Heart when moving into rooms that are empty.
Suggested skills[]
To help survive this early variant phase, there are two character passive skills that can help. One is Encourage, which can help cover the potential failed rolls of the Goblin Staff once in a while. The other is Discipline, which can restore focus to characters that are fully out of focus if the character with the Discipline skill either kills an enemy or achieves a critical success. Only the Monk character comes with the Discipline ability, so this character is a nice addition to your team! The Minstrel comes with Encourage built in, so this is also another good choice for the team.
Variant setup #2[]
Suggested Weapon Variants[]
- Volcanic Tome
- Starfish Staff
- A weapon with a single target Reset ability.
Strategy[]
In this variant, the character with the highest intelligence (the Scholar) will use the Volcanic Tome to Reset the enemy team using Fire Wall. Fire Wall is a support ability that requires 5 roll checks and comes with a -15% penalty per roll, but it resets the entire enemy team! So to compensate for that -15% penalty, it requires that ![]() 2 be put into each use of Fire Wall so that the remaining 3 roll checks are relying on the Scholar's intelligence stat. That should be 95% if you can max out that intelligence stat. Supported by the Minstrel's Encourage ability, this allows the Volcanic Tome to succeed around 95% of the time. The Scholar will only be able to use this Fire Wall ability probably 3 times before they are totally out of focus. So once the Scholar runs out of focus to keep the Volcanic Tome going, they must switch into the Starfish Staff. This will allow them to restore
2 be put into each use of Fire Wall so that the remaining 3 roll checks are relying on the Scholar's intelligence stat. That should be 95% if you can max out that intelligence stat. Supported by the Minstrel's Encourage ability, this allows the Volcanic Tome to succeed around 95% of the time. The Scholar will only be able to use this Fire Wall ability probably 3 times before they are totally out of focus. So once the Scholar runs out of focus to keep the Volcanic Tome going, they must switch into the Starfish Staff. This will allow them to restore ![]() 4 per use of the Starfish Staff.
4 per use of the Starfish Staff.
Hopefully by the time you need to make this switch, the Monk and Minstrel have killed one if not two of the enemies. If you only have one enemy left, the Minstrel or Monk can use a weapon that comes with a single target Reset ability. Continue to reset the last enemy while the Scholar slowly restores every team member's focus pool, 4 points at a time. I usually make use of weapons like the Hooked Sword, Gladius, Archlute, Theorbo, or Fancy Theorbo to get in the single target resets. I prefer that both the Monk and Minstrel have a weapon with a single target reset ability so I can handle occasional fails by one or the other.
The first 10 rooms[]
This variant isn't perfect. You will take damage from occasional failures as well as really fast enemies that are quicker than the Scholar. However, the damage you do take is far less than if you weren't using this strategy. With good use of regeneration items and the limited number of godsbeard you get, this should be enough to get you through 10 rooms. Then you repeat the same process for the next 10 rooms, healing at the end with godsbeard or tinder pouches to keep going.Summing up[]
Eventually, if you're able to acquire the full setup, you'll take less damage than the godsbeard resources you pick up at each goblin merchant every 10 rooms. So you'll start to build a stockpile of godsbeard as well as a stockpile of money![]() . Every new goblin shop will then potentially give you more gear that can help maximize the process. So perhaps your Scholar only had
. Every new goblin shop will then potentially give you more gear that can help maximize the process. So perhaps your Scholar only had ![]() 93 instead of
93 instead of ![]() 95...if you keep going you'll eventually find the gear needed to max out all three characters' respective stats.
95...if you keep going you'll eventually find the gear needed to max out all three characters' respective stats.
Well… I hope you liked the ideas presented here! Good luck with your Hildebrant's Cellar dives!
Highest known room record[]
Room 402 and still going: https://www.twitch.tv/videos/622208667
Update: Now at room 445 and still going.
𝒮epran currently holds the last known proven record with 5342 rooms cleared with a solo Hunter.
Highest Proven Recorded Room Count
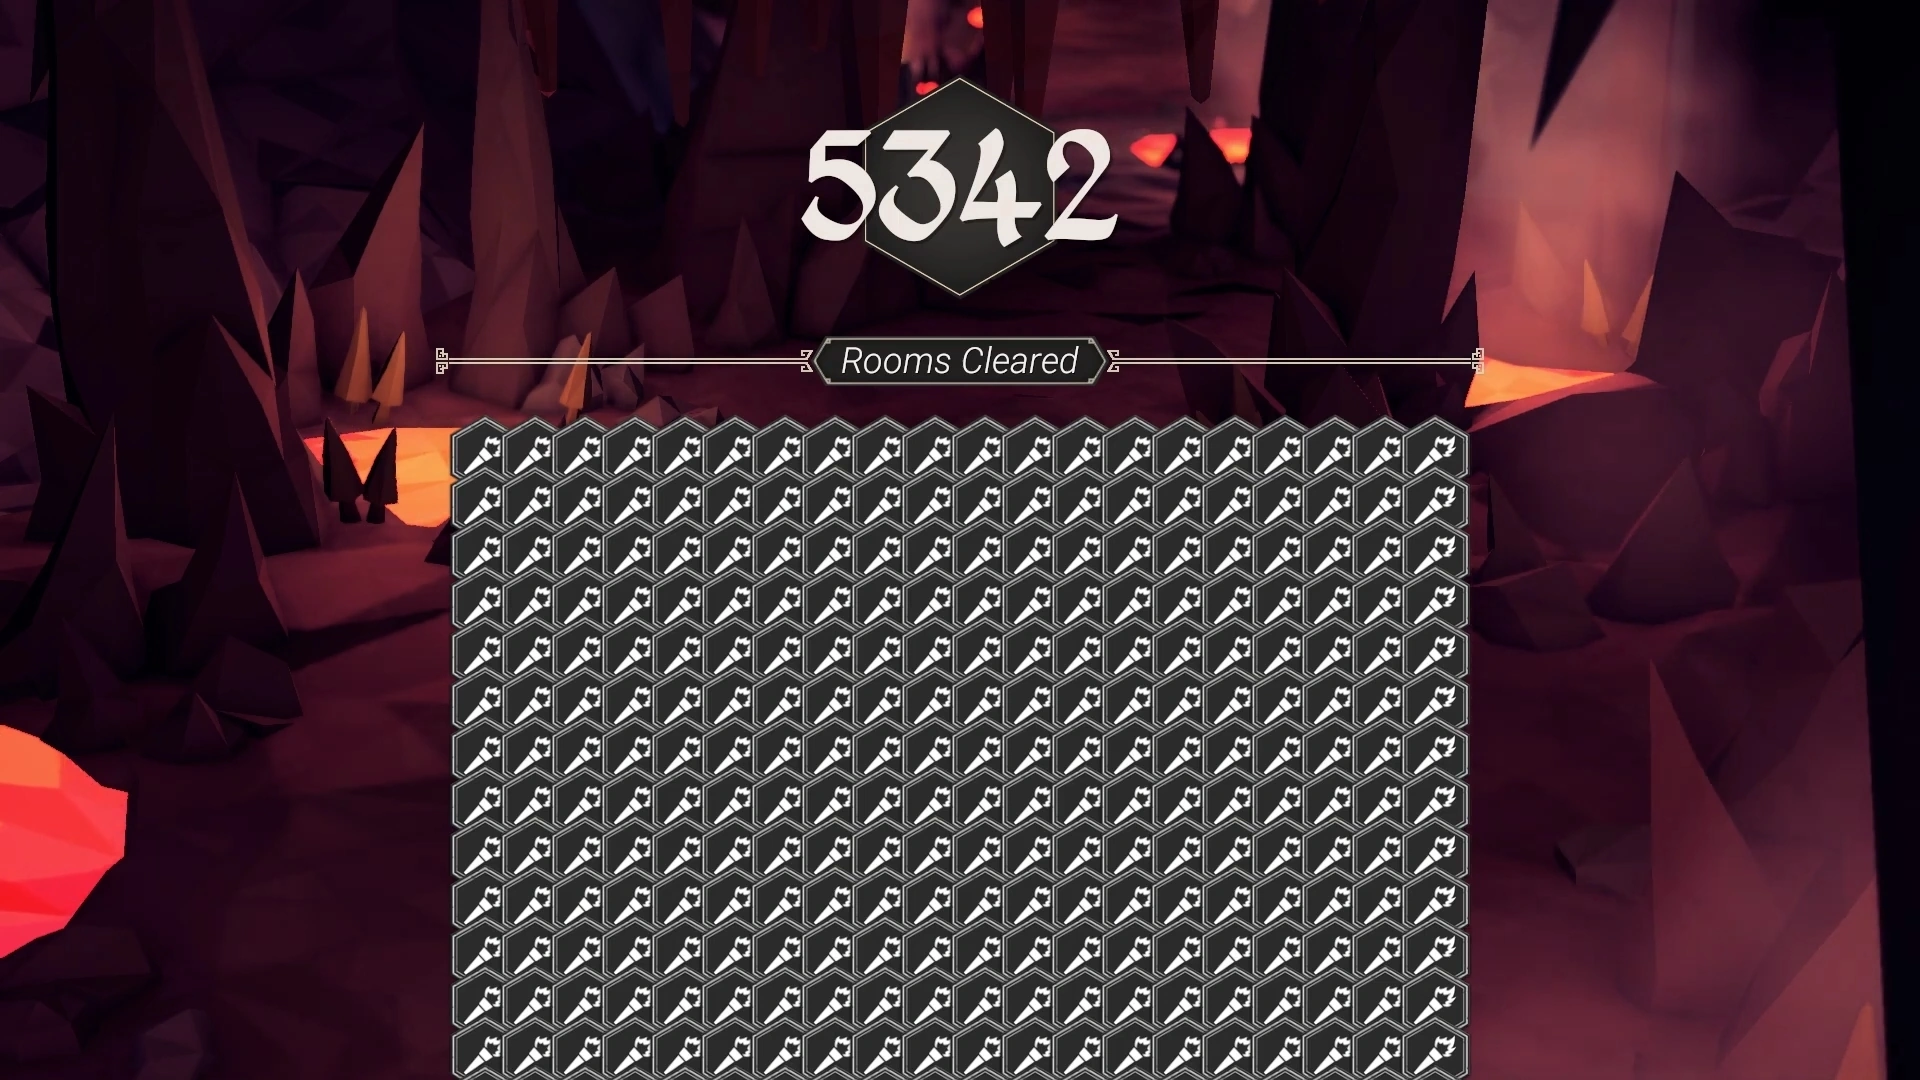

09/05/2022
This is the Hunter and what it can do!
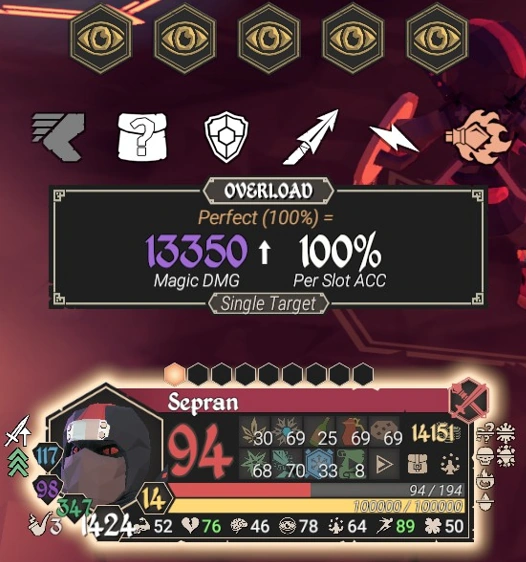

09/05/2022
Old 𝒮epran Record with 3-character team:
Current 3-Character Team 𝒮epran Record
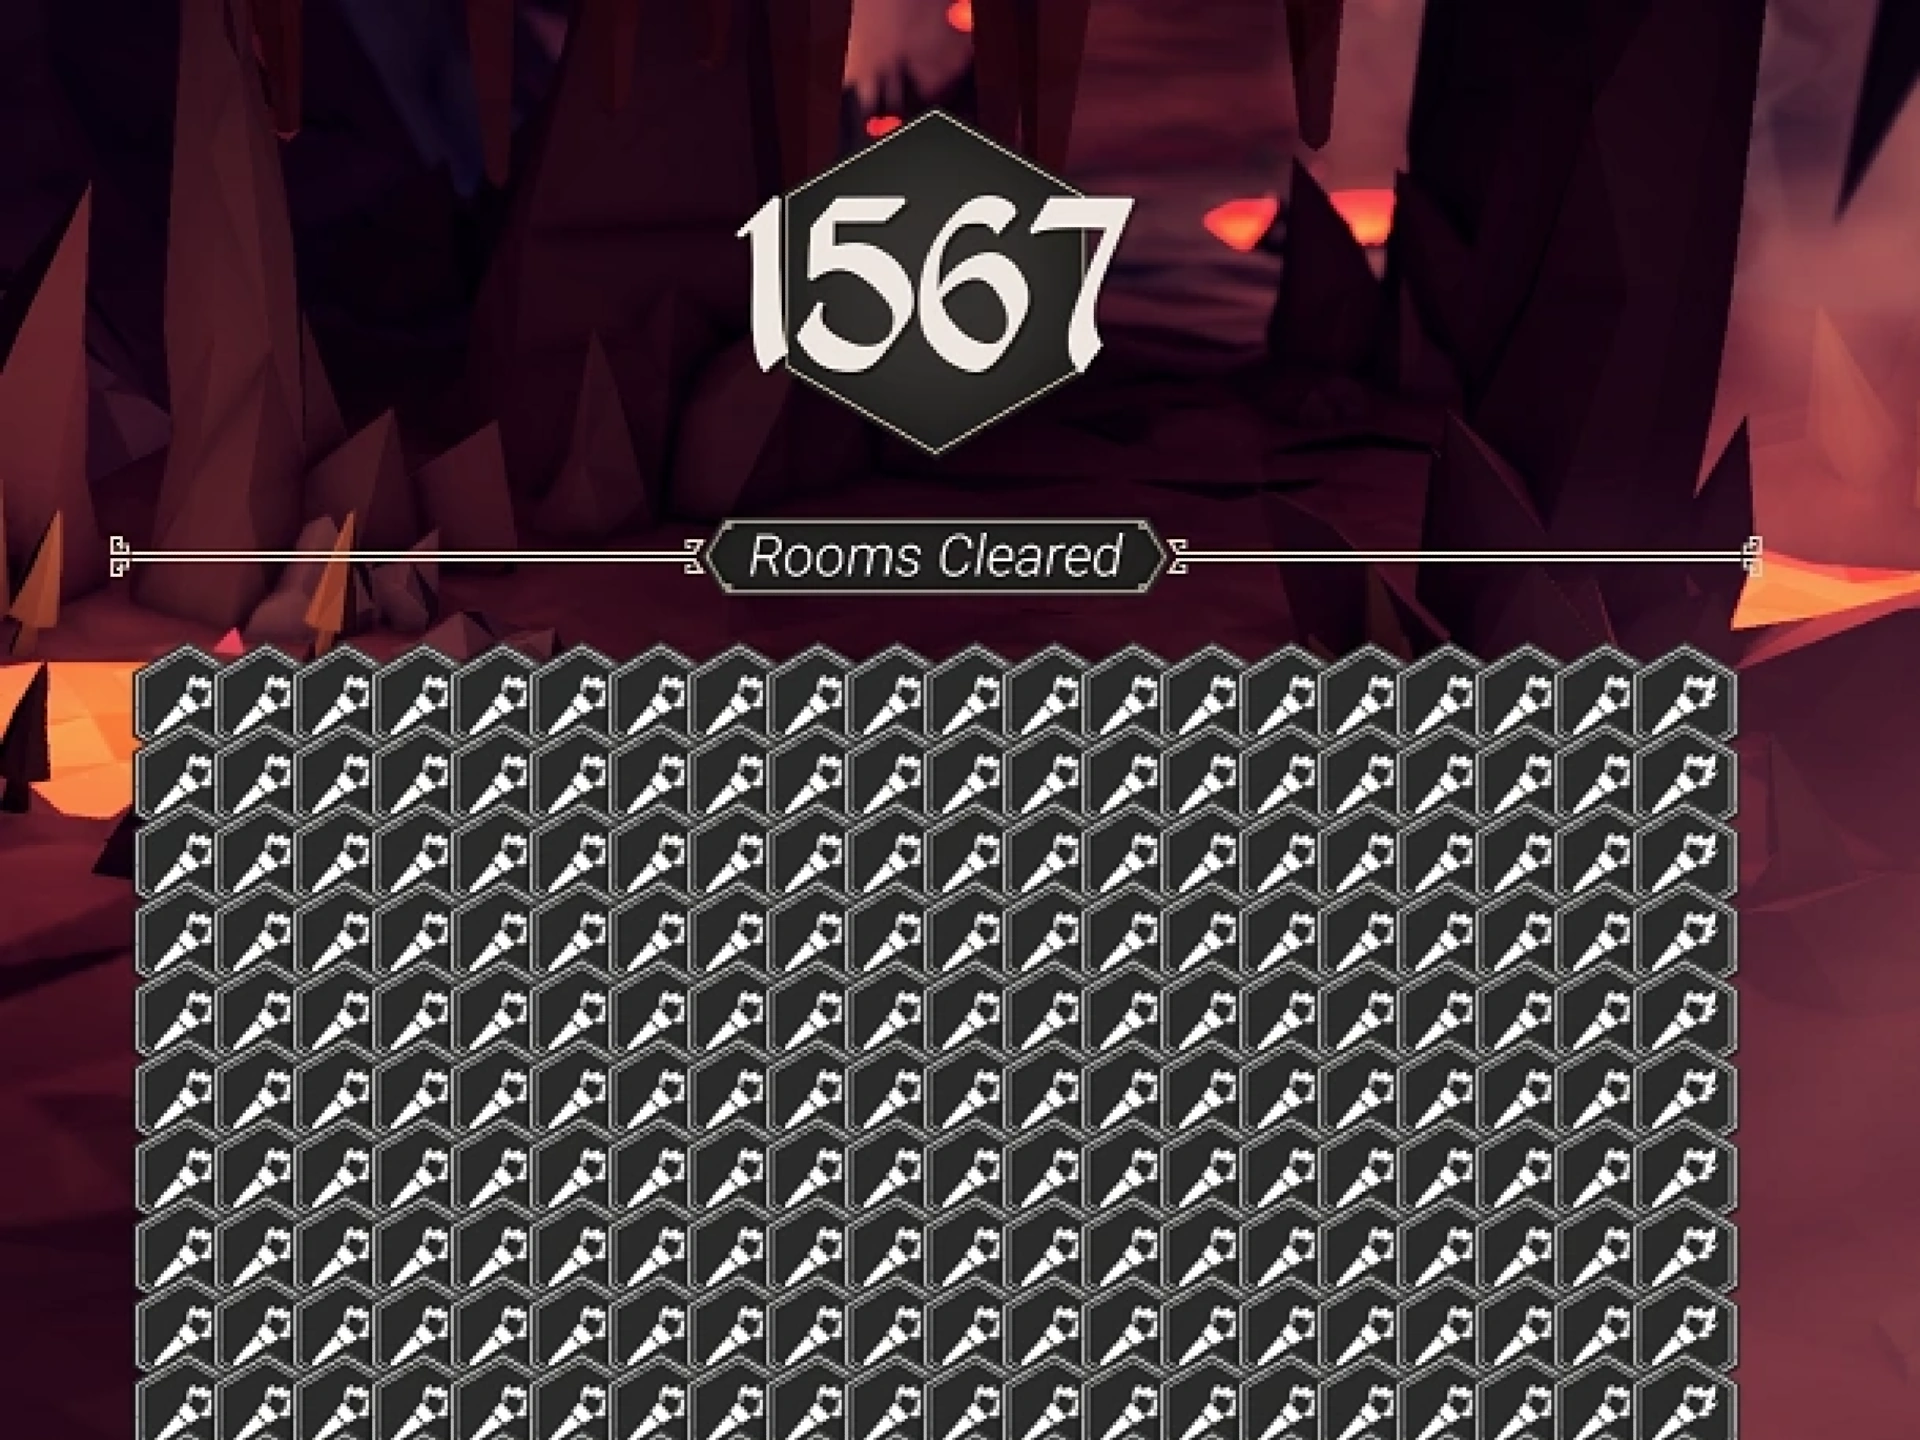


09/17/2021
~
Author: SirImperialMike (talk) 17:00, 5 January 2022 (UTC)
| For The King Master Guide • Dungeon Crawl • Frost Adventure • Infinite Hildebrant's Cellar • Into The Deep • Lost Civilization |